Docker (software)소개 및 구성
2015년 12월 11일 금요일
오전 10:53
2015년 12월 11일 금요일
오전 10:53
Doker는 리룩스 환경에서 어플리케이션을 실행하는데 데 필요한 환경과 소프트웨어를 가상 컨테이너에 패키징하는 도구로서, 어플리케이션이 수행되는 환경이 실제 물리서버나, 또는 클라우드 환경이든지 그 여하를 떠나, 쉽게 배포할 수 있도록 해준다.
Docker는 오픈소스 프로젝트이며, 리룩스의 operation-system-level 가상화를 통해 추가적인 추상화 계층과 자동화를 제공하여, 소프트웨어 컨테이너 내에서 응용프로그램 배포를 자동화하는데 사용된다.
Docker는 기술적으로, 리룩스 커널의 리소스 격리기능을 사용하여, 단일 리룩스 인스턴스내에서 독립적인 컨테이너를 실행할 수 있게 해주는데, 가상화 머신인 하이퍼바이저를 시작하고, 관리할 필요가 없는 이점을 가지고 있다.
리룩스 커널이 대부분 지원하고 있는 네임스페이스는 어플리케이션의 동작환경이나, 프로세스 트리, 네트워크, 사용사ID 와 파일 마운트 시스템등을 격리시키며, 반면 커널의 cgroups은 CPU, memory, I/O 블록과 네트워크 같은 리소스 격리를 제공한다.
Docker 버전 0.9부터 libcontainer 라는 라이블러리를 탑재하고 있는데, 이 라이블러리는 리룩스 커널이 제공하는 가상화 기능을 직접적으로 사용하도록 한다.
또한 추가적으로 libvirt, LXC(Linux Containers) 와 systemd-nspawn를 통한 가상화 추상 인터페이스를 사용한다.
Overview
Docker는 프로세스가 격리된 상태에서 실행될 수 있게 하는 경량화 컨테이너를 제공해주는 API를 구현하고 있다.

위, 이미지에서 보는 것 처럼, 대부분의 가상화 기능은 리룩스 커널(cgroups, namespaces)에 의해 제공됨으로, Docker는 다른 가상화 머신처럼, 별도의 운영체제를 가질 필요가 없다.
대신, 리룩스 커널의 기능와 리소스 격리(cpu, memory, i/o block, network, etc)를 사용하고, 분리된 네임스페이스를 사용하여 운영시스템의 어플리케이션을 격리시킨다.
Docker 설치 전 준비
- Prerequisites
- Docker는 64bit Ubuntu 운영체제에서 동작된다.
- Kernel은 최소한 3.10이상
다음 명령어로 커널 버전 확인
$ uname -r
3.11.0-15-generic
apt source 업데이트
- gpg 키 추가
에디터로 /etc/apt/sources.list.d/docker.list 생성
- 파일이 없다면 생성할 것
- 기존 내용이 있다면, 모두 제거한다.
- Ubuntu operating system에 맞게 수정
Ubuntu Trusty 14.04 (LTS)
deb https://apt.dockerproject.org/repo ubuntu-trusty main
On Ubuntu Vivid 15.04
deb https://apt.dockerproject.org/repo ubuntu-vivid main
/etc/apt/sources.list.d/docker.list file 저장
- $ apt-get update
Purge the old repo if it exists.
- $ apt-get purge lxc-docker
Verify that apt is pulling from the right repository.
- $ apt-cache policy docker-engine
Prerequisites by Ununtu Version
- Ubuntu Wily 15.10
- Ubuntu Vivid 15.04
- Ubuntu Trusty 14.04 (LTS)
Ubuntu Trusty, Vivid, and Wily 에디션은 다음의 linux-image-extra kernel package 설치가 권장.
linux-image-extra package는 aufs storage driver를 사용할 수 있게한다.
linux-image-extra package 설치
Open a terminal on your Ubuntu host.
- $ sudo apt-get update
- $ sudo apt-get install linux-image-extra-$(uname -r)
Docker 설치
다음 절차를 통해 Docker 설치:
Log into your Ubuntu installation as a user with sudoprivileges.
Update your apt package index.
- $ sudo apt-get update
Install Docker.
- $ sudo apt-get install docker-engine
Start the docker daemon.
- $ sudo service docker start
Verify docker is installed correctly.
- $ sudo docker run hello-world
자동 시작 서비스
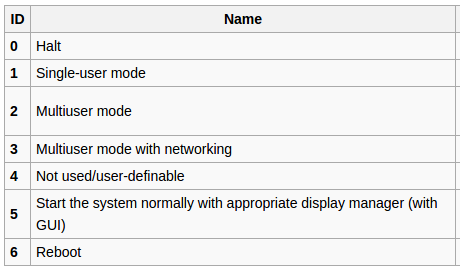
On Ubuntu > 14, the equivalent to chkconfig is sysv-rc-conf. So, we use this instead of chkconfig for Run-level configuration. The sysv-rc-conf an easily communicate and managing with /etc/rc{runlevel}.d/ symlinks.
See the runlevel table below:
We may want to install the sysv-rc-conf package using apt-get command, and then run sysv-rc-conf:
$ sudo apt-get install sysv-rc-conf
$ sudo sysv-rc-conf --list
$ sudo sysv-rc-conf docker on
$ sudo sysv-rc-conf --list
...
docker 2:on 3:on 4:on 5:on
...
원본 위치 <http://www.bogotobogo.com/DevOps/Docker/Docker_Install_On_Ubuntu_14.php>
Docker 명령어

Optional configurations
This section contains optional procedures for configuring your Ubuntu to work better with Docker.
Create a docker group
Adjust memory and swap accounting
Enable UFW forwarding
Configure a DNS server for use by Docker
Configure Docker to start on boot
Create a Docker group
The docker daemon binds to a Unix socket instead of a TCP port. By default that Unix socket is owned by the user rootand other users can access it with sudo. For this reason,docker daemon always runs as the root user.
To avoid having to use sudo when you use the dockercommand, create a Unix group called docker and add users to it. When the docker daemon starts, it makes the ownership of the Unix socket read/writable by the docker group.
Warning: The docker group is equivalent to the root user; For details on how this impacts security in your system, see Docker Daemon Attack Surface for details.
To create the docker group and add your user:
Log into Ubuntu as a user with sudo privileges.
- This procedure assumes you log in as the ubuntu user.
- $ sudo usermod -aG docker ubuntu
- This ensures your user is running with the correct permissions.
- $ docker run hello-world
- If this fails with a message similar to this:
- Cannot connect to the Docker daemon. Is 'docker daemon' running on this host?
- Check that the DOCKER_HOST environment variable is not set for your shell. If it is, unset it.
Adjust memory and swap accounting
When users run Docker, they may see these messages when working with an image:
WARNING: Your kernel does not support cgroup swap limit.
WARNING: Your kernel does not support swap limit capabilities. Limitation discarded.
To prevent these messages, enable memory and swap accounting on your system. Enabling memory and swap accounting does induce both a memory overhead and a performance degradation even when Docker is not in use. The memory overhead is about 1% of the total available memory. The performance degradation is roughly 10%.
To enable memory and swap on system using GNU GRUB (GNU GRand Unified Bootloader), do the following:
Log into Ubuntu as a user with sudo privileges.
Edit the /etc/default/grub file.
Set the GRUB_CMDLINE_LINUX value as follows:
- GRUB_CMDLINE_LINUX="cgroup_enable=memory swapaccount=1"
Update GRUB.
- $ sudo update-grub
Enable UFW forwarding
If you use UFW (Uncomplicated Firewall) on the same host as you run Docker, you’ll need to do additional configuration.
Docker uses a bridge to manage container networking.
By default, UFW drops all forwarding traffic.
As a result, for Docker to run when UFW is enabled, you must set UFW’s forwarding policy appropriately.
Also, UFW’s default set of rules denies all incoming traffic.
If you want to reach your containers from another host allow incoming connections on the Docker port.
The Docker port defaults to 2376 if TLS is enabled or 2375 when it is not.
If TLS is not enabled, communication is unencrypted.
By default, Docker runs without TLS enabled.
To configure UFW and allow incoming connections on the Docker port:
Log into Ubuntu as a user with sudo privileges.
- $ sudo ufw status
- $ sudo nano /etc/default/ufw
- DEFAULT_FORWARD_POLICY="ACCEPT"
- $ sudo ufw reload
- $ sudo ufw allow 2375/tcp
Configure a DNS server for use by Docker
Systems that run Ubuntu or an Ubuntu derivative on the desktop typically use 127.0.0.1 as the default nameserverin /etc/resolv.conf file.
The NetworkManager also sets updnsmasq to use the real DNS servers of the connection and sets up nameserver 127.0.0.1 in /etc/resolv.conf.
When starting containers on desktop machines with these configurations, Docker users see this warning:
WARNING: Local (127.0.0.1) DNS resolver found in resolv.conf and containers
can't use it. Using default external servers : [8.8.8.8 8.8.4.4]
The warning occurs because Docker containers can’t use the local DNS nameserver. Instead, Docker defaults to using an external nameserver.
To avoid this warning, you can specify a DNS server for use by Docker containers.
Or, you can disable dnsmasq in NetworkManager. Though, disabling dnsmasq might make DNS resolution slower on some networks.
To specify a DNS server for use by Docker:
Log into Ubuntu as a user with sudo privileges.
Open the /etc/default/docker file for editing.
- $ sudo nano /etc/default/docker
- DOCKER_OPTS="--dns 8.8.8.8"
- Replace 8.8.8.8 with a local DNS server such as192.168.1.1. You can also specify multiple DNS servers. Separated them with spaces, for example:
- --dns 8.8.8.8 --dns 192.168.1.1
- Warning: If you’re doing this on a laptop which connects to various networks, make sure to choose a public DNS server.
Restart the Docker daemon.
- $ sudo restart docker
Or, as an alternative to the previous procedure, disablednsmasq in NetworkManager (this might slow your network).
Open the /etc/NetworkManager/NetworkManager.conffile for editing.
- $ sudo nano /etc/NetworkManager/NetworkManager.conf
- dns=dnsmasq
- $ sudo restart network-manager
- $ sudo restart docker
Configure Docker to start on boot
Ubuntu uses systemd as its boot and service manager15.04 onwards and upstart for versions 14.10 and below.
For 15.04 and up, to configure the docker daemon to start on boot, run
$ sudo systemctl enable docker
For 14.10 and below the above installation method automatically configures upstart to start the docker daemon on boot
Upgrade Docker
To install the latest version of Docker with apt-get:
$ apt-get upgrade docker-engine
Uninstallation
To uninstall the Docker package:
$ sudo apt-get purge docker-engine
To uninstall the Docker package and dependencies that are no longer needed:
$ sudo apt-get autoremove --purge docker-engine
The above commands will not remove images, containers, volumes, or user created configuration files on your host. If you wish to delete all images, containers, and volumes run the following command:
$ rm -rf /var/lib/docker
You must delete the user created configuration files manually.
원본 위치 <https://docs.docker.com/engine/installation/ubuntulinux/>
Docker Mysql 이미지 컨테이너 설치
원본 위치 <https://hub.docker.com/r/mysql/mysql-server/> 참조
이미지 다운로드
docker pull mysql/mysql-server
Mysql 컨테이너 실행
docker run --name my-container-name -e MYSQL_ROOT_PASSWORD=my-secret-pw -d mysql/mysql-server:tag
유니코드 설정 UTF-8
docker run --name my-container-name -d mysql/mysql-server --character-set-server=utf8 --collation-server=utf8_general_ci
태그 리스트
MySQL Server 5.5 (tag: 5.5)
MySQL Server 5.6 (tag: 5.6)
ySQL Server 5.7, the latest GA version (tag: 5.7 or latest)
실행예)
docker run --name mysql_db -e MYSQL_ROOT_PASSWORD=1234 -d mysql/mysql-server:5.6
--호스트 경로에 데이터파일 경로를 설정
docker run --name dev-mysql -v /mysql/datadir:/var/lib/mysql -e MYSQL_ROOT_PASSWORD=root -d mysql:5.6
Docker 셀을 통해 mysql 클라이언트 실행
docker exec -it my-container-name bash
원본 위치 <https://hub.docker.com/r/mysql/mysql-server/>
PuTTY를 통해 Docker 컨테이너에 원격 액세스
- 컨테이너의 22번 포트 포워딩
--> 호스트의 9090 포트를 컨테이너의 22 포트로 포워딩처리
Docker ps
Docker 컨테이너의 ssH 설치
- Apt-get update
- Apt-get install ssh
- Apt-get install vim --> vi 에디터 인스톨
Vi /etc/ssh/sshd_config 의 다음 항목을 열어 Root 계정 접근 허용
PermitRootLogin without-password 를 yes로 변경
PermitRootLogin yes
Docker container assign public ip address(공용 IP지정)
- IP aliasing 를 활용
예)
eth0가 주 인터페이스, 가상 인터페이스 eth0:1에 ip 지정
Ifconfig eth0:1 10.0.0.11 netmask 255.255.255.0 up
또는
ip addr add 10.0.0.99/8 dev eth0
docker run -p 10.0.0.11:5000:5000 -name container2 <someimage> <somecommand>
docker run -i -t --rm -p 10.0.0.99:80:8080 base
Docker 명령어
docker run --rm -t -i phusion/passenger-full bash -l
docker exec -t -i phusion/passenger-full bash -l
참고 문서
댓글 없음:
댓글 쓰기